How to fill the JEECUP 2026 application form — step-by-step with screenshots
A screenshot walkthrough of the JEECUP 2026 application — sign-in, instructions, DPDP consent, personal details, qualification, document uploads, preview and fee payment. Bilingual EN/Hindi portal, written for first-generation engineering families in Eastern UP.
The JEECUP 2026 application form (the UPJEE Polytechnic exam, conducted by the Joint Entrance Examination Council (Polytechnic), Uttar Pradesh) is the single gateway into BIPE — and into every BTEUP-affiliated polytechnic across UP. The portal is bilingual (English / Hindi), reasonably structured, and free to use — but the volume of consent forms, eligibility checks, document specs and verification steps catches families off guard every year. This post walks through the application from sign-in to fee payment with screenshots from the 2026 cycle, so you know exactly what each screen expects before you start.
What you need before you start
- Active mobile number and email — both will be OTP-verified, so the candidate or a parent must have them open during application.
- Aadhaar card — number ready (you'll have an option to consent to its use or decline; declining adds a manual identity-verification step).
- Class 10 marksheet — passing status, year, board, roll number, maximum and obtained marks, percentage.
- Identity document — Aadhaar / PAN / Voter ID / Ration Card (one of).
- Recent passport photograph and signature — JPG format, 15–200 KB each, plus a fresh live photograph (10–500 KB) taken at the time of application.
- Examination fee — Rs. 300 for General/OBC, Rs. 200 for SC/ST (per form), plus bank charges. Online payment only.
- Category certificate — only if applying under SC/ST/OBC/EWS. Original at the tehsildar / SDM office.
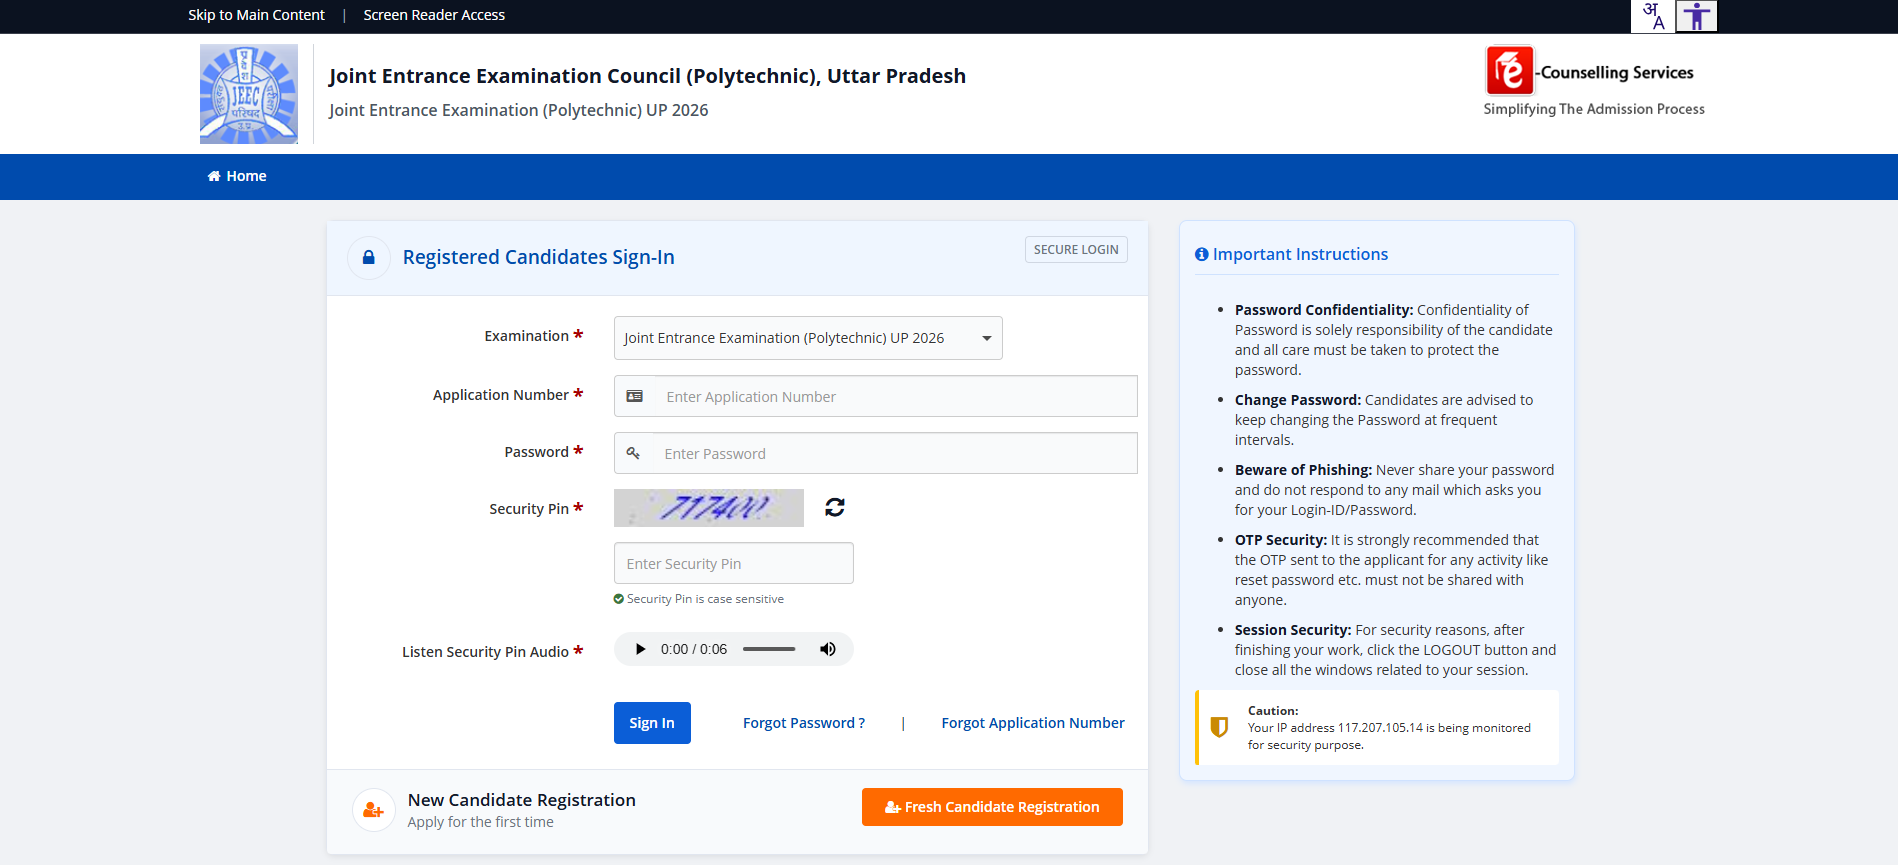
Step 1 — Open the portal and choose Fresh Candidate Registration
The portal at jeecup.admissions.nic.in opens to a sign-in page for already-registered candidates. First-time applicants scroll to the bottom and click the orange Fresh Candidate Registration button.
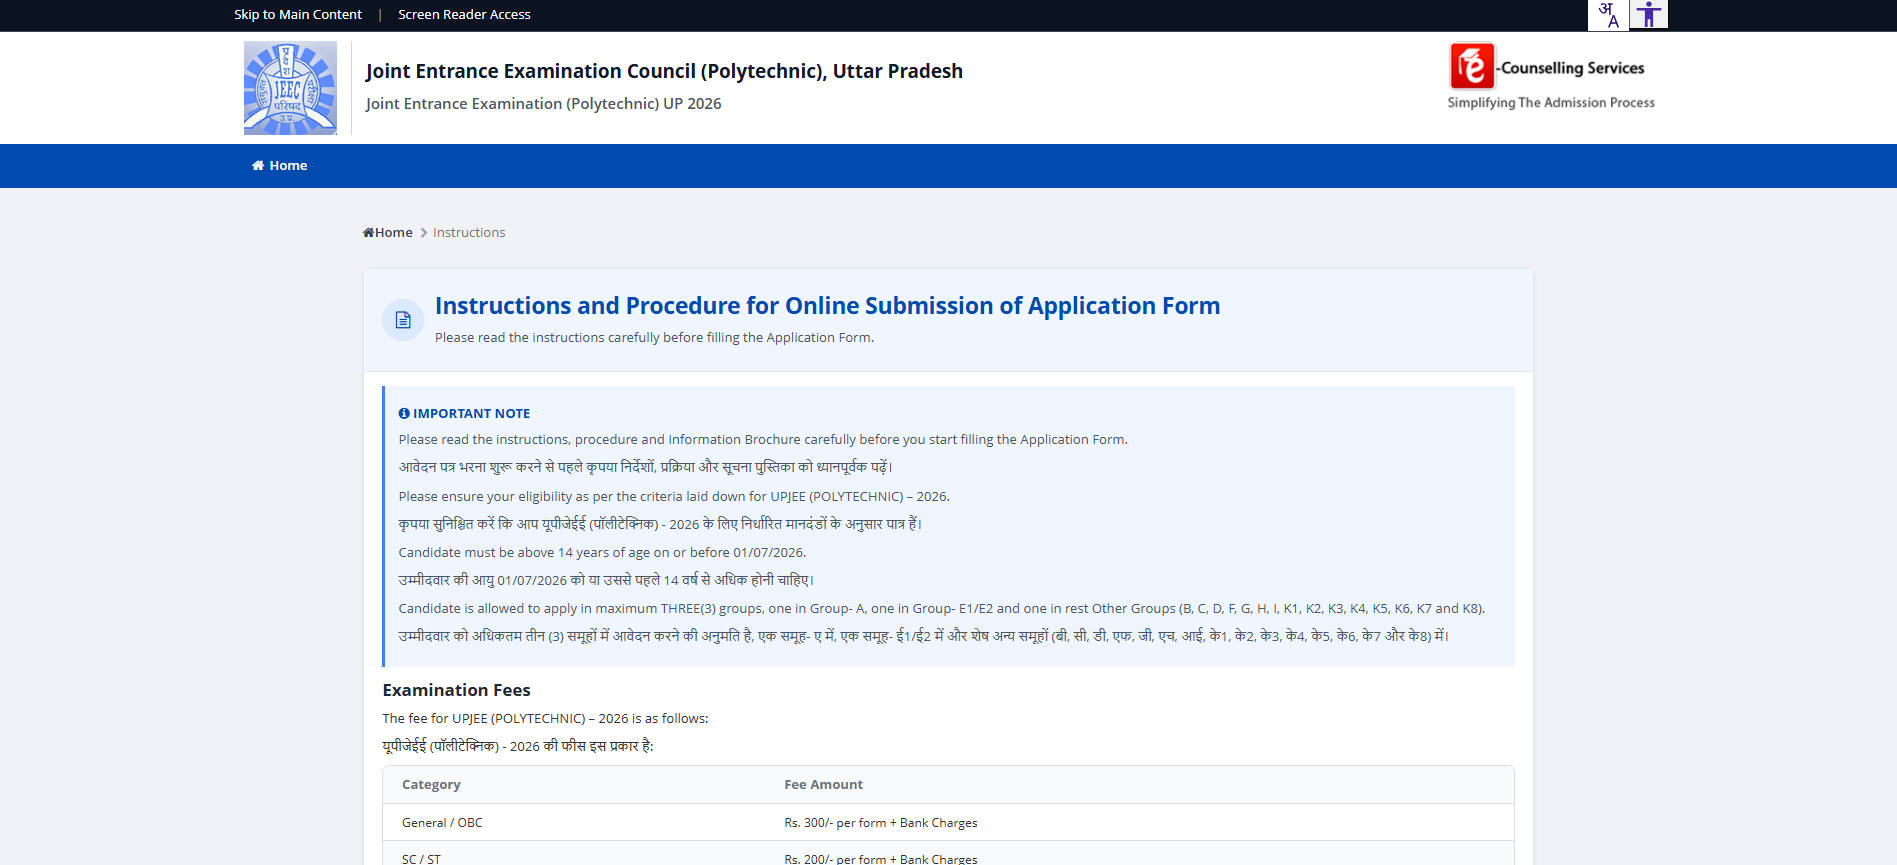
Step 2 — Read the Instructions and the fee schedule
The first page after clicking Fresh Candidate Registration is the Instructions and Procedure page. It's bilingual (EN/Hindi), and worth reading line by line — it confirms the minimum age (14 on or before 01/07/2026), the rule about applying to maximum three groups (one in Group-A, one in E1/E2, one in others), and the examination fees:
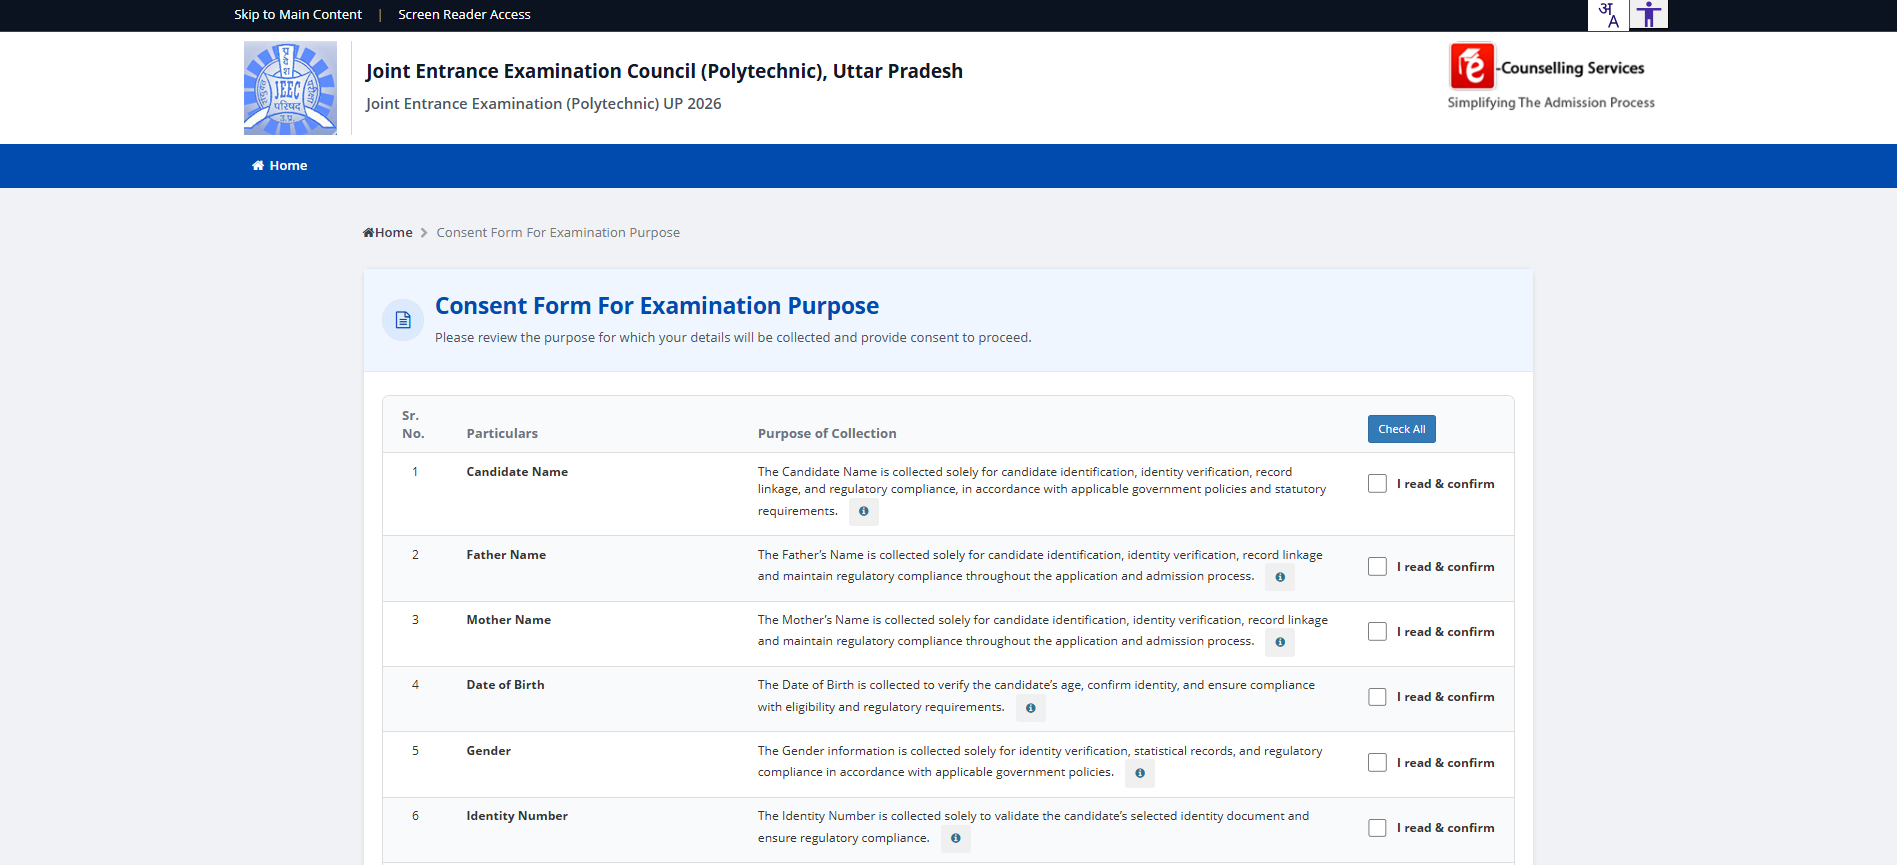
Step 3 — Consent to data collection (DPDP)
Per the Digital Personal Data Protection Act 2023, every Indian government portal now collects explicit consent before recording personal data. JEECUP's consent form lists each field (Candidate Name, Father, Mother, DOB, Gender, Identity Number, etc.) with the specific purpose it's collected for. You must tick "I read & confirm" on each row, or use the Check All shortcut at the top.
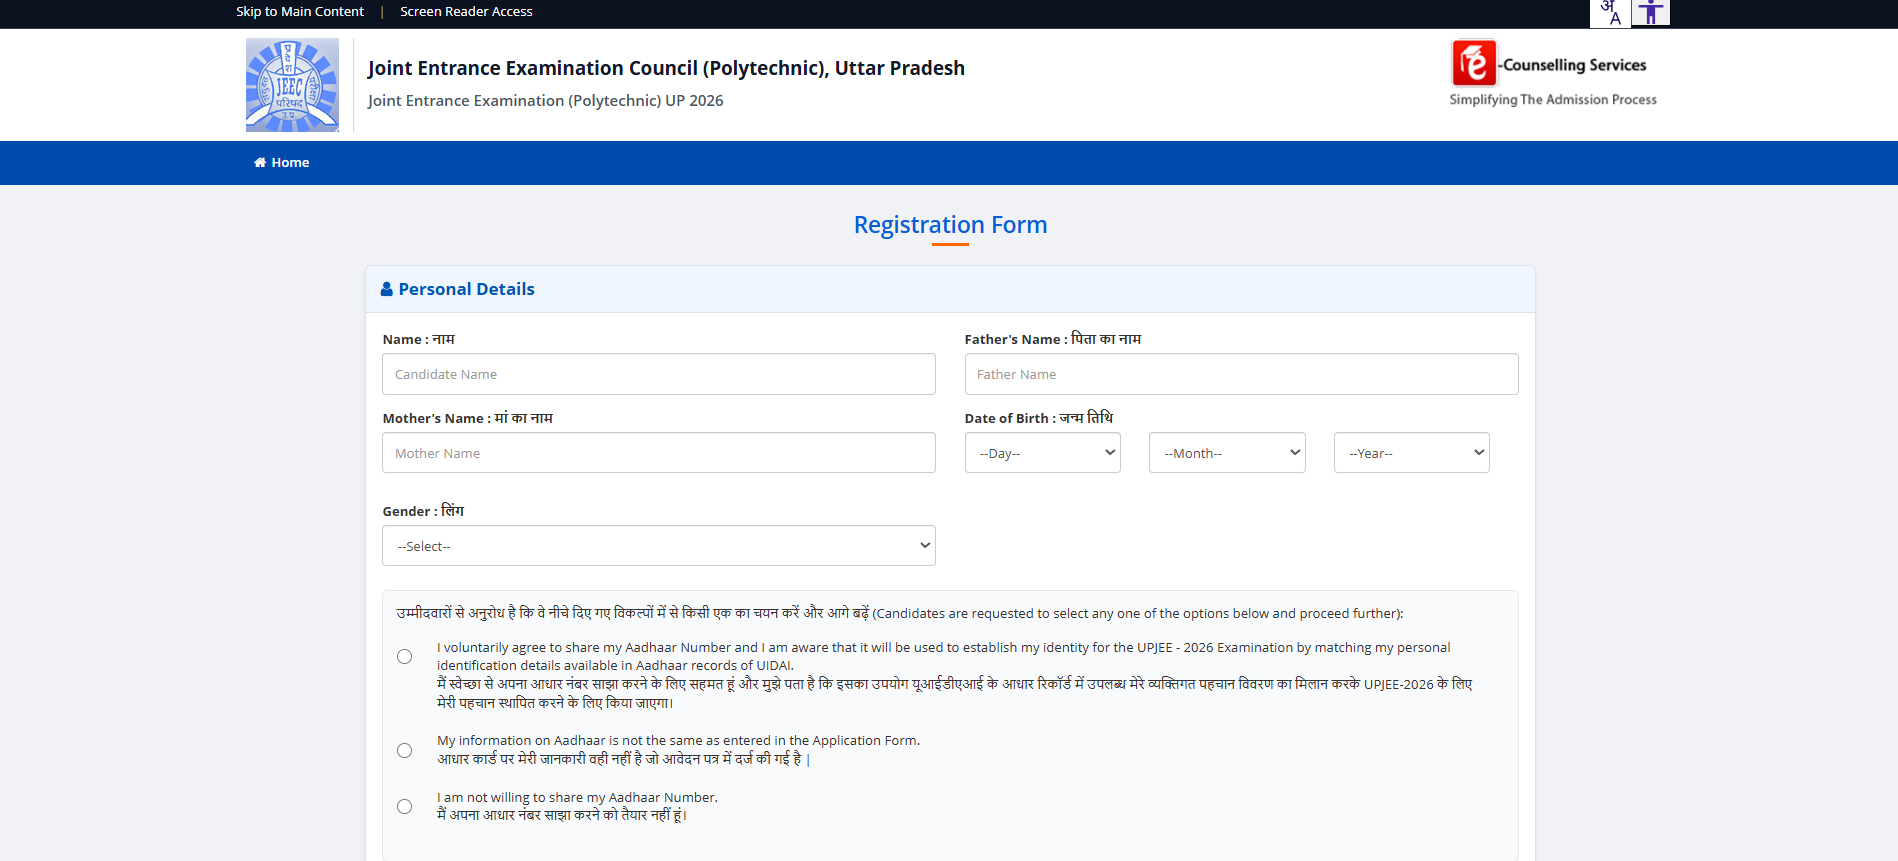
Step 4 — Fill the Registration Form
The Registration Form captures basic identity: Name, Father's Name, Mother's Name, Date of Birth (three dropdowns), Gender. Below that is the Aadhaar consent block — three radio options:
- Voluntarily share Aadhaar — used for identity matching against UIDAI records (recommended for fastest verification)
- Aadhaar info doesn't match the form — for cases where your Aadhaar name/details differ from your school records
- Not willing to share Aadhaar — adds a manual identity verification step later
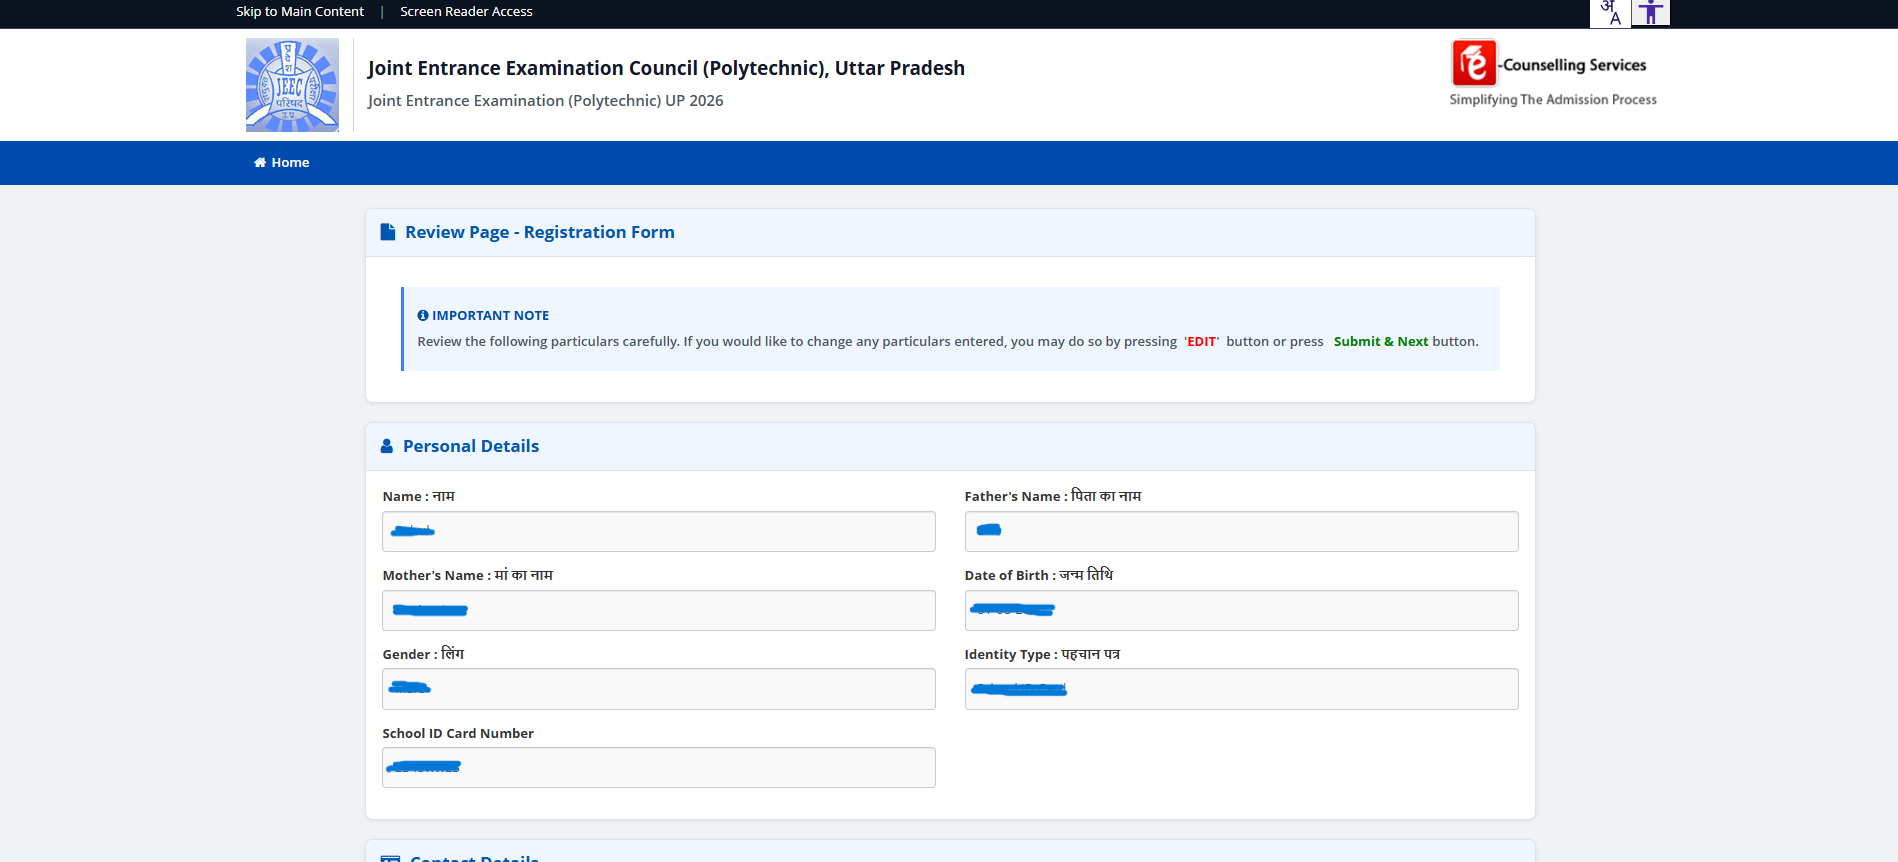
Step 5 — Review and confirm the Registration entries
After filling the registration form, JEECUP shows a Review Page with every field you entered. If anything is wrong — name spelling, date of birth, gender, school ID — click EDIT and fix it before clicking Submit & Next. Errors here cascade through the rest of the form and are painful to correct later.
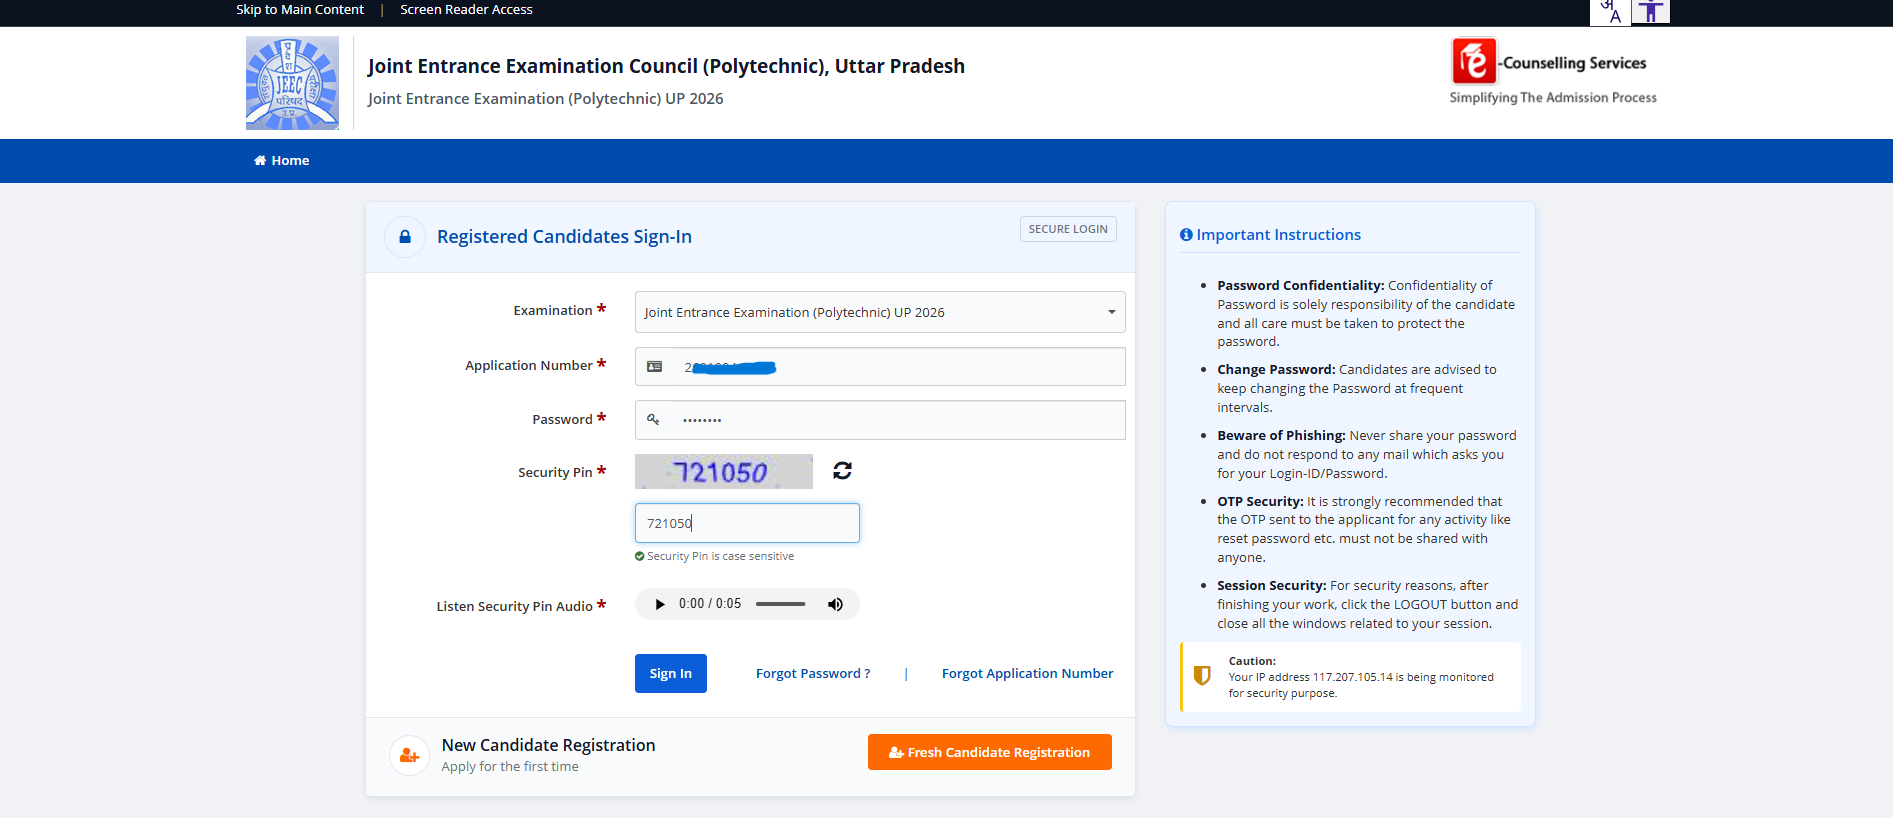
Step 6 — Sign in as a Registered Candidate
After registration, the portal issues you an Application Number and you set a Password and Security PIN. Return to the home sign-in page (Step 1) and enter your Application Number, password, and the displayed Security Pin (the wobbly captcha). The portal also reads the pin aloud for accessibility.
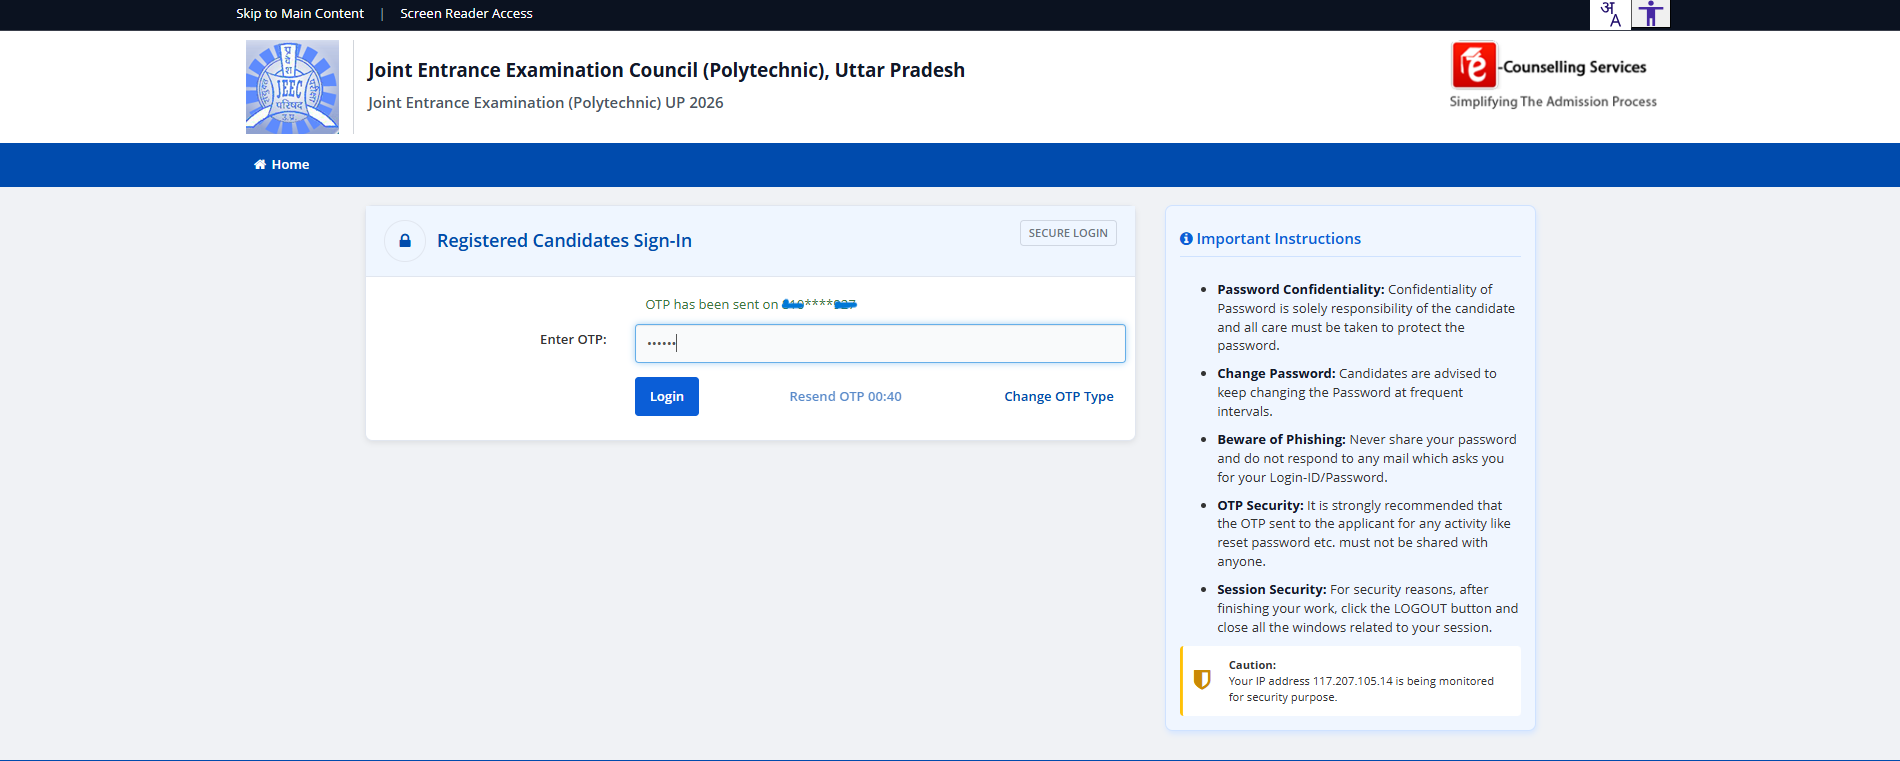
Step 7 — Verify via OTP
Successful sign-in triggers a One-Time Password sent to your registered mobile. Enter the 6-digit OTP and click Login. The OTP is time-limited (typically 30 seconds shown in the resend timer); if it expires, click Resend OTP.
Step 8 — Reconfirm consent inside the application
On first sign-in to the application proper, the portal shows the consent form again — this time with your data filled in. Confirm each row (the checkmarks now show as black ticks) and proceed.

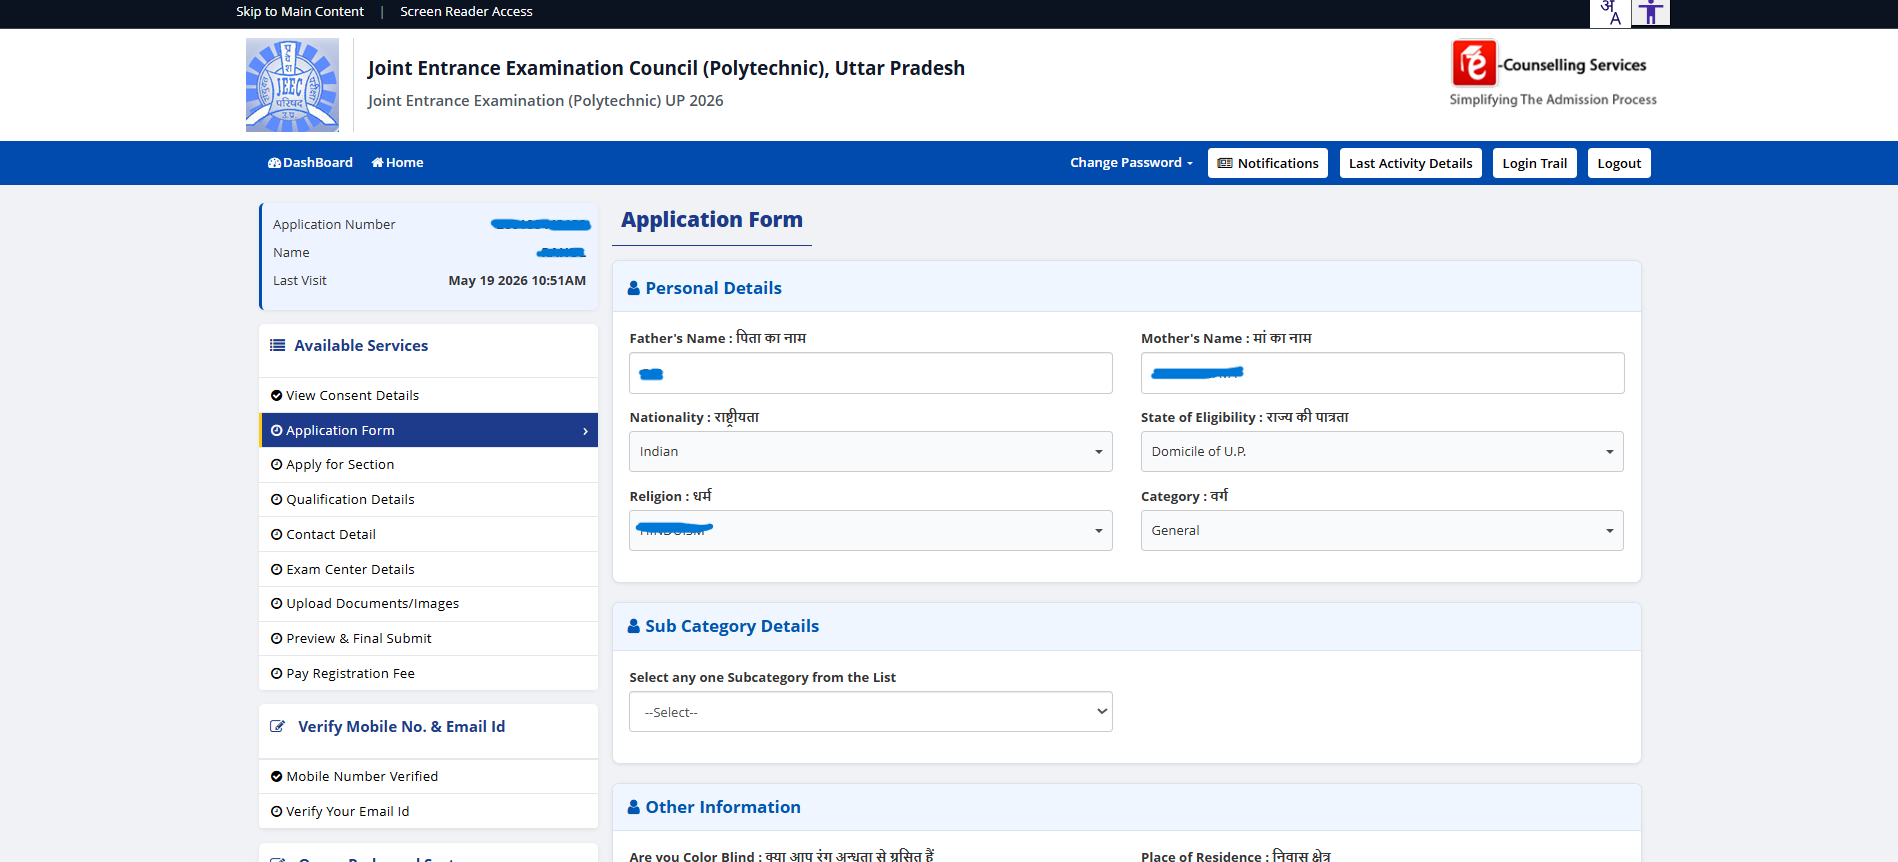
Step 9 — Complete the Application Form (Personal Details)
The main Application Form extends Personal Details with State of Eligibility, Religion and Category. The left sidebar lists every section you'll need to complete:
- Application Form — extended personal, parents, nationality, state of eligibility, religion, category
- Apply for Section — which JEECUP group(s) you're applying to (Group A = the polytechnic engineering paper for diploma branches at BIPE)
- Qualification Details — Class 10 board marks (covered next)
- Contact Detail — address, mobile, email
- Exam Center Details — preferred exam city
- Upload Documents/Images — photo, signature, live photo
- Preview & Final Submit — review everything
- Pay Registration Fee — final step
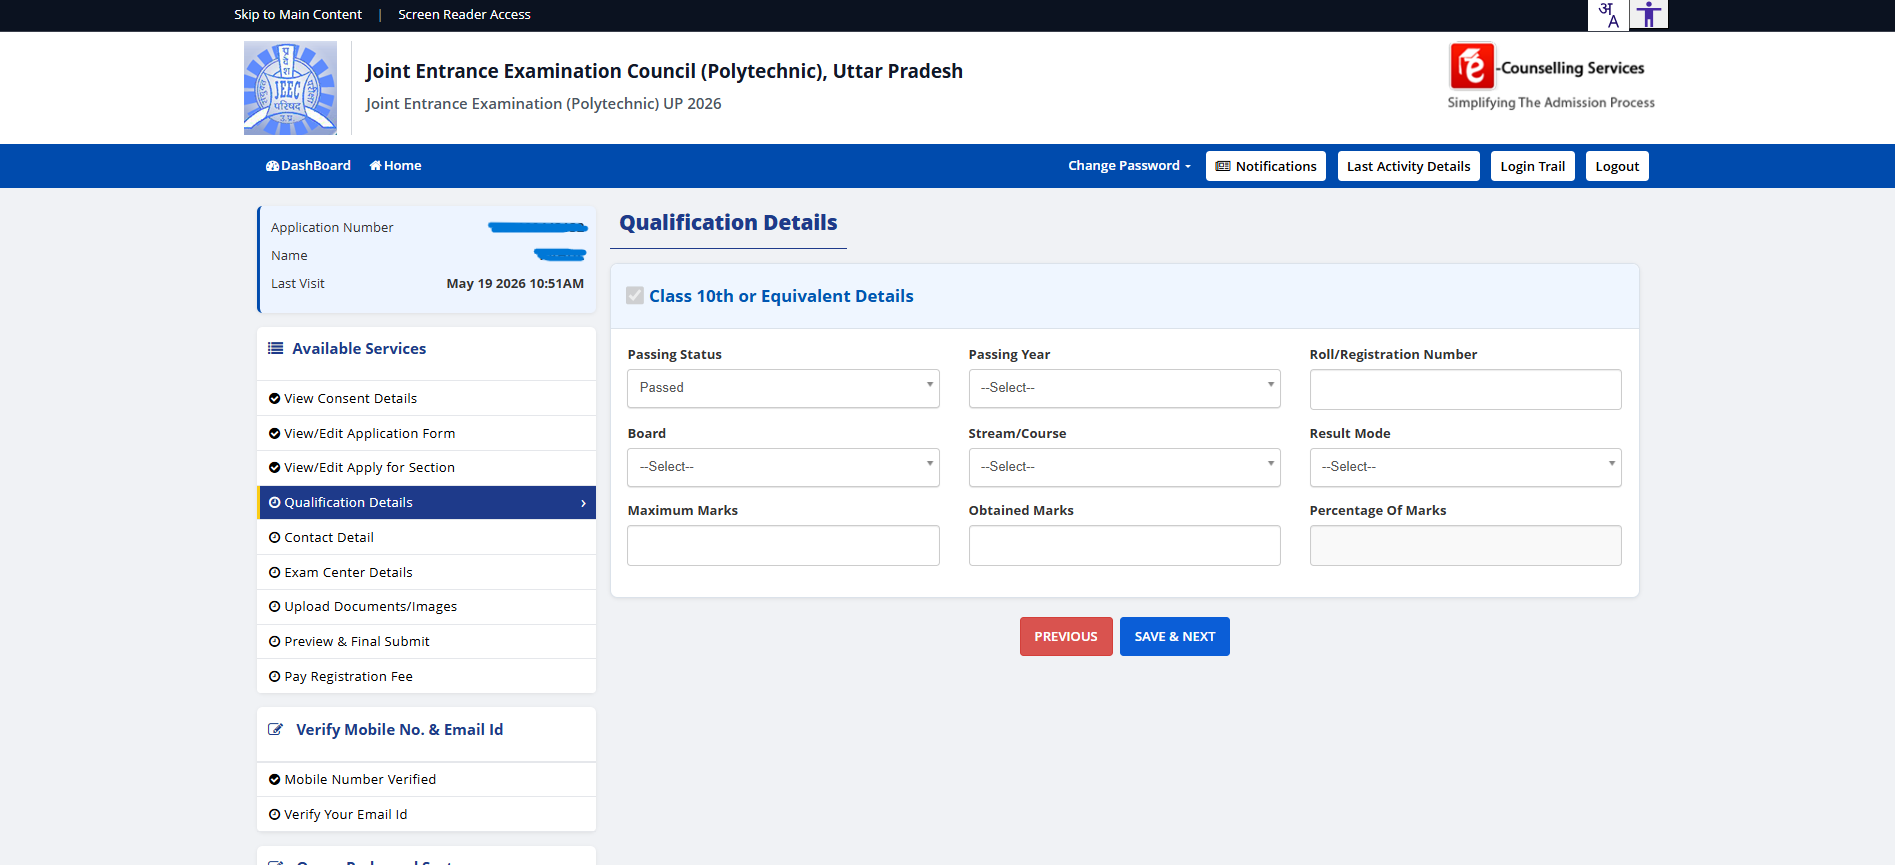
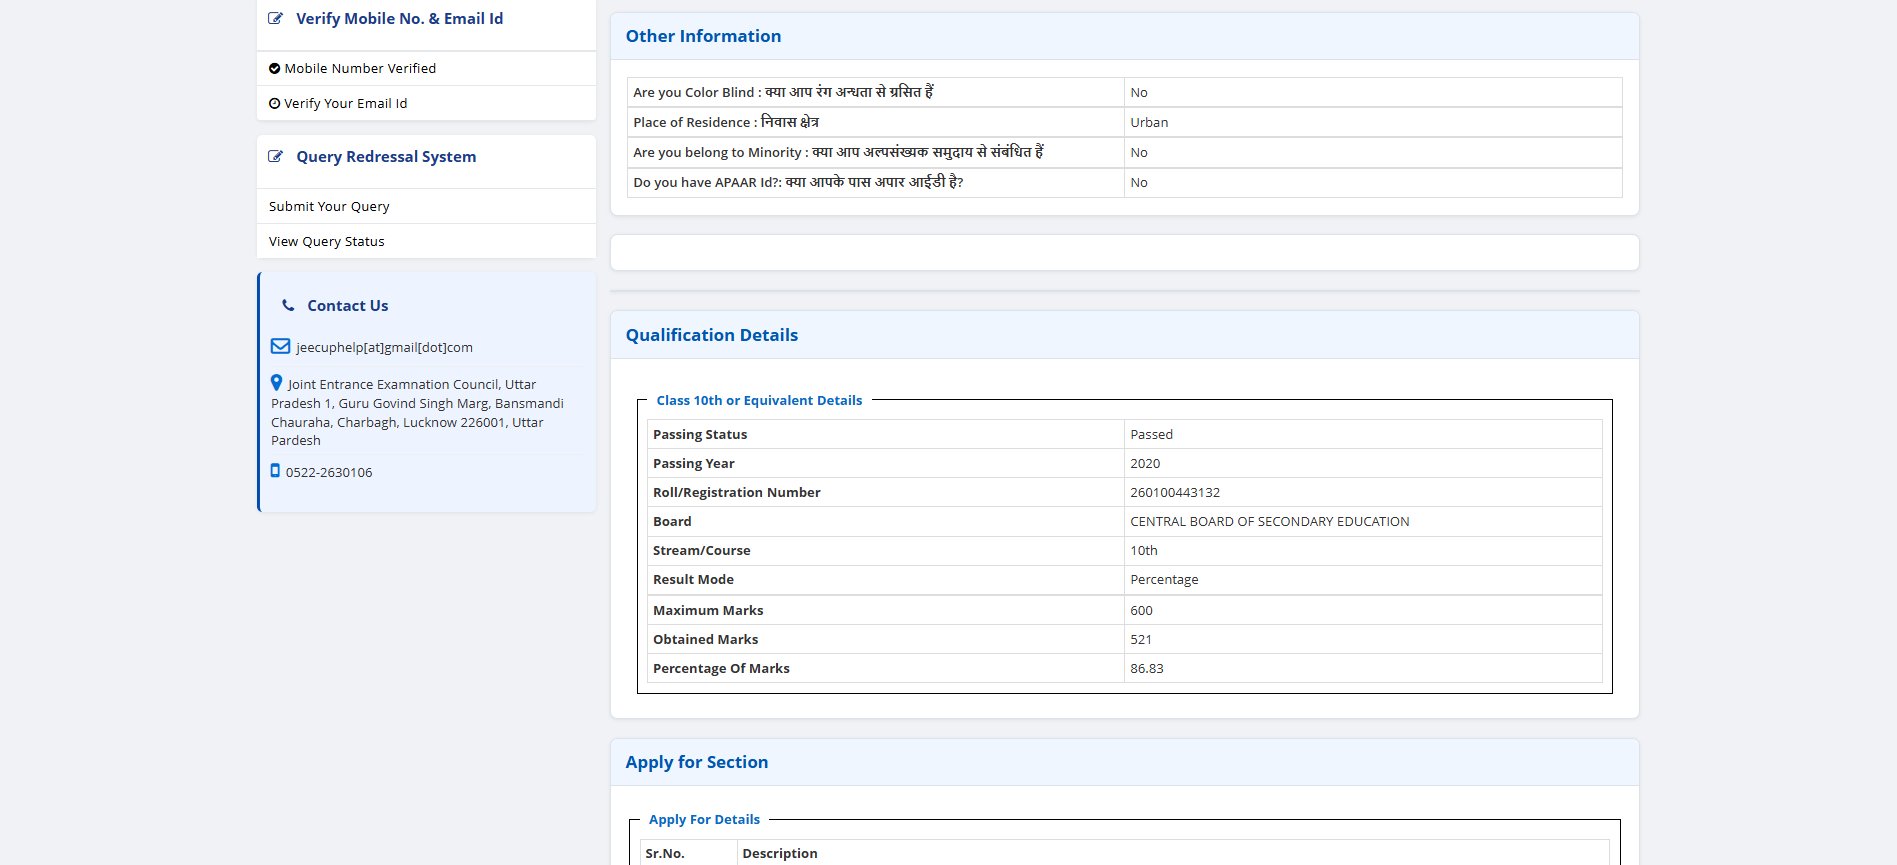
Step 10 — Qualification Details (Class 10 board marks)
The Qualification Details section captures your Class 10 or Equivalent board record: Passing Status (Passed / Appearing), Passing Year, Roll/Registration Number, Board, Stream/Course (typically "10th"), Result Mode (Percentage / CGPA), Maximum Marks and Obtained Marks. The portal computes Percentage automatically.
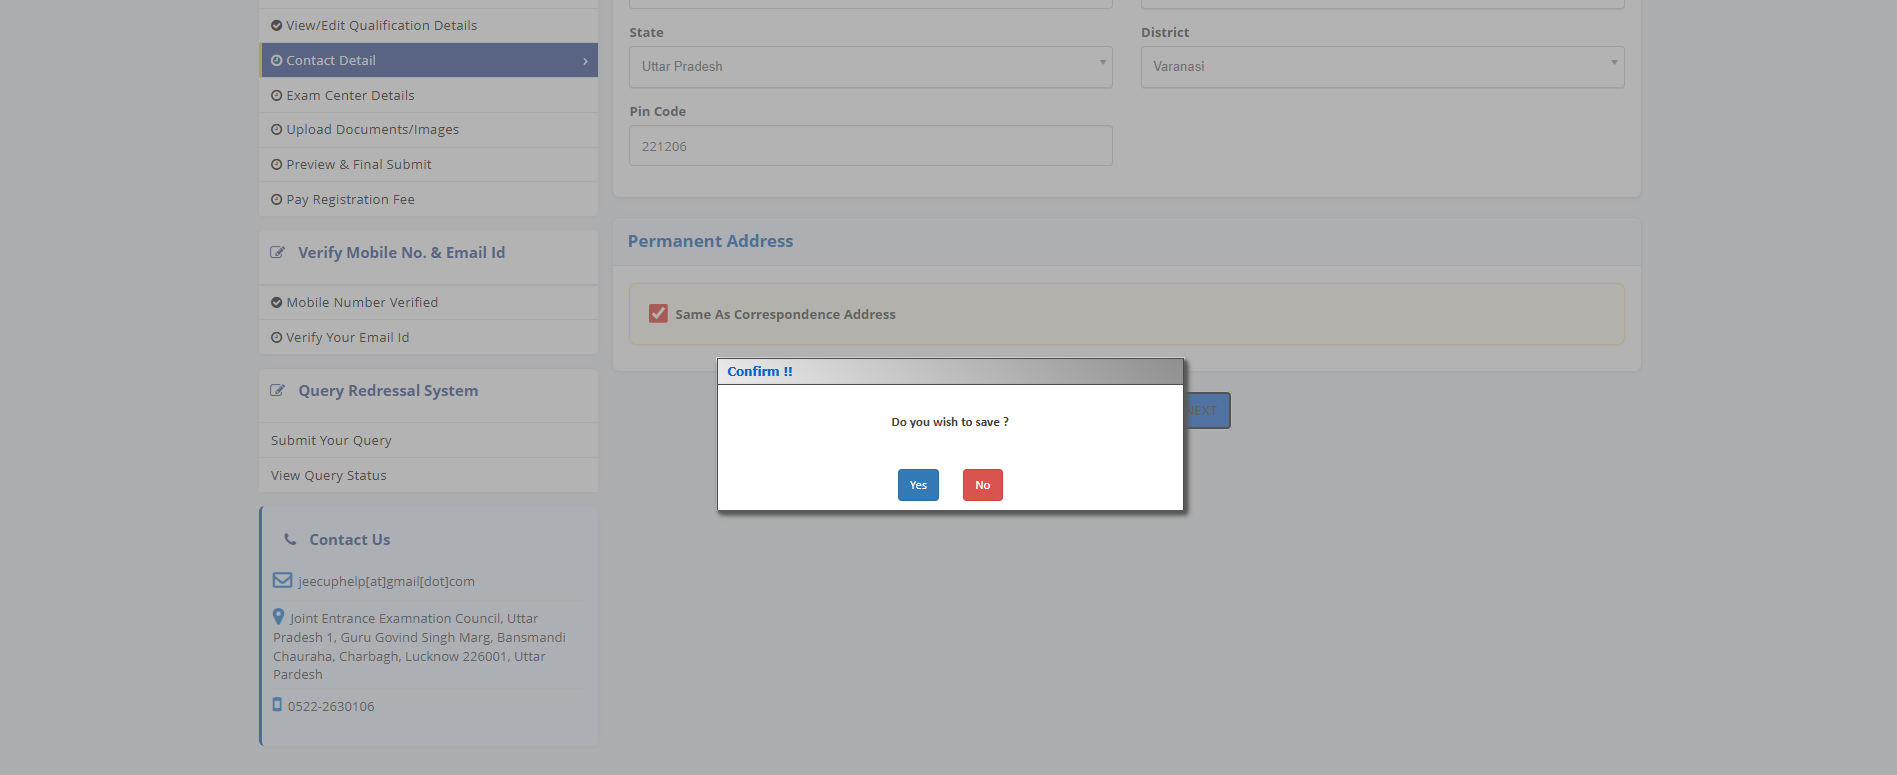
Step 11 — Contact details and exam centre preference
After Qualification, the form moves to Contact Detail (address, mobile, email — already partly filled from registration) and Exam Center Details (a list of preferred exam cities; pick the one nearest to where you'll be in March-April of the cycle).
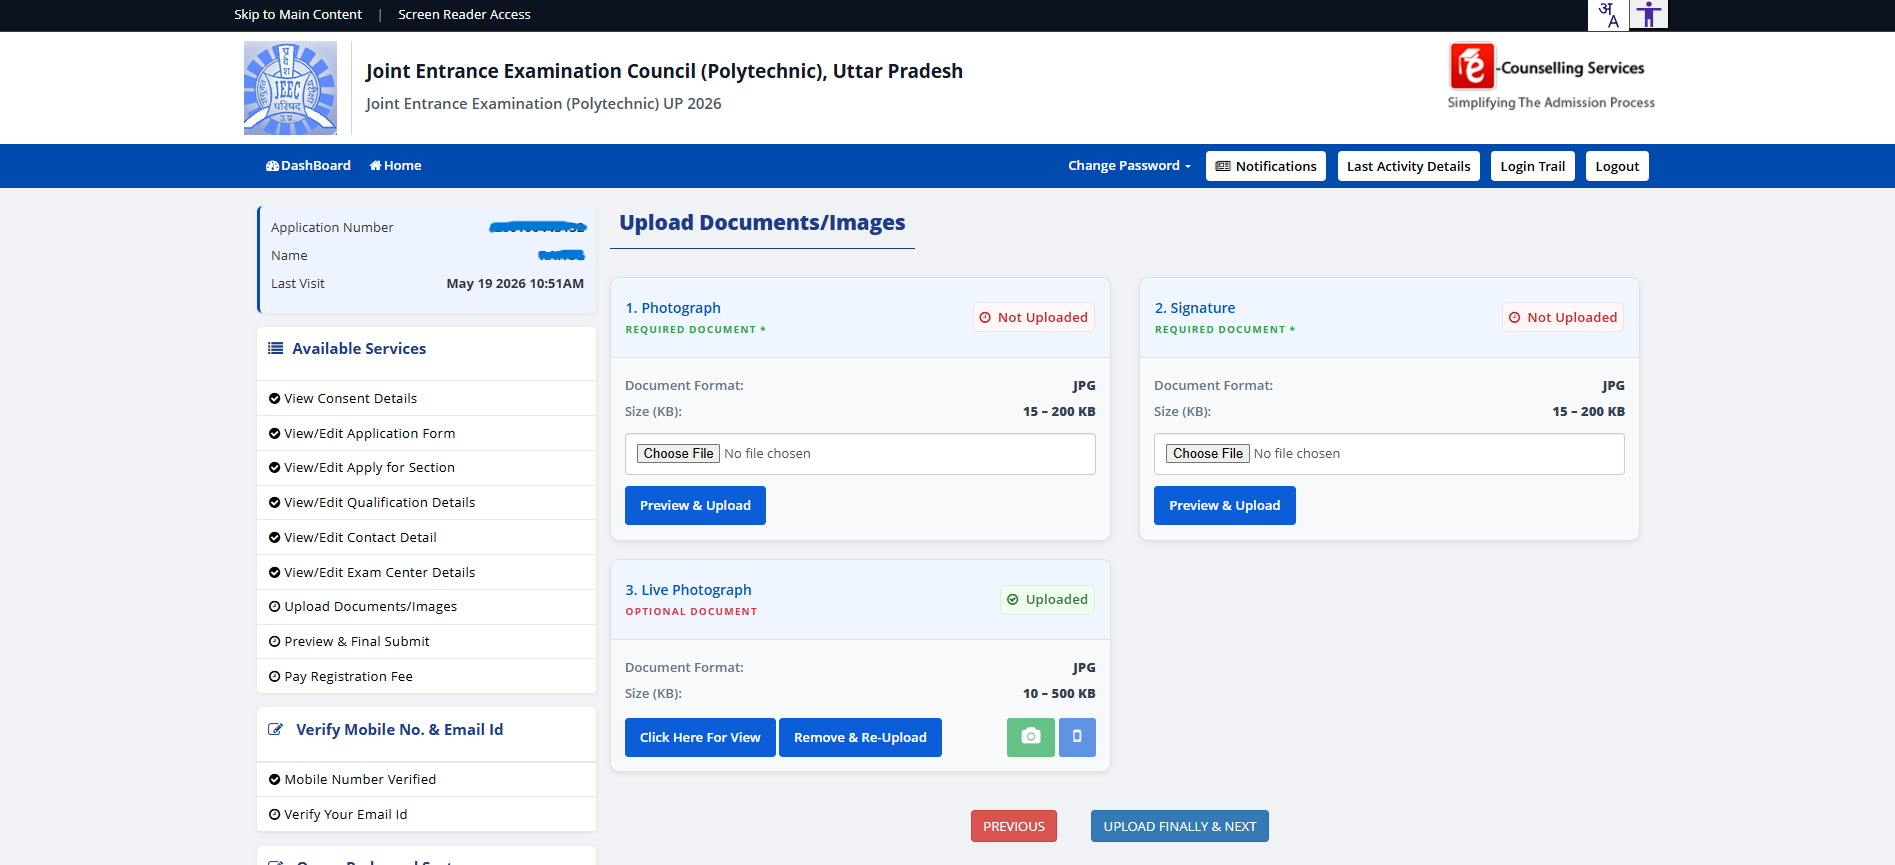
Step 12 — Upload photograph, signature and live photograph
Three uploads are mandatory:
- Photograph — JPG, 15–200 KB. Recent, formal, light background. Same photo for all 8 hard copies you'll carry later.
- Signature — JPG, 15–200 KB. Written on plain white paper with a black pen, then scanned/photographed.
- Live Photograph — JPG, 10–500 KB. Taken at the time of application via the device camera. The portal opens the camera; can't be a stored file.
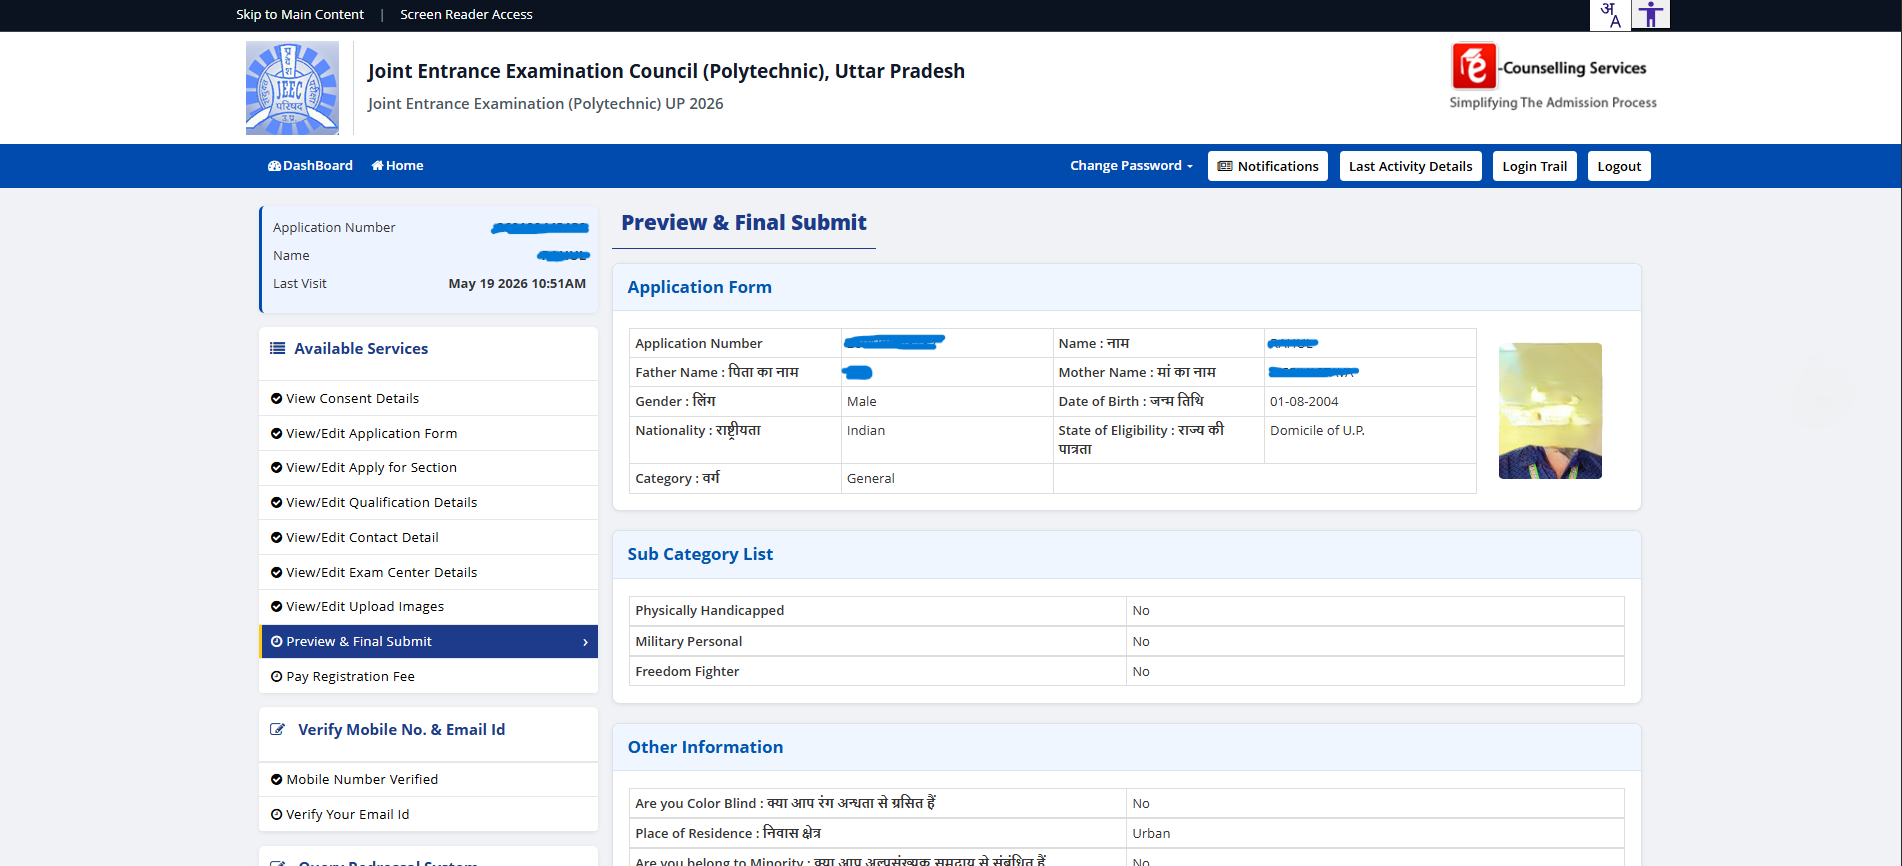
Step 13 — Final Preview before fee payment
Preview & Final Submit shows your entire application — application number, name, father, mother, photo + signature thumbnails in the upper-right, sub-category details, other information, qualification details, applied sections. Scroll all the way to the bottom and read everything. Once you submit, only specific fields can be corrected later via the portal's edit window (typically a 3–5 day window after the application close).
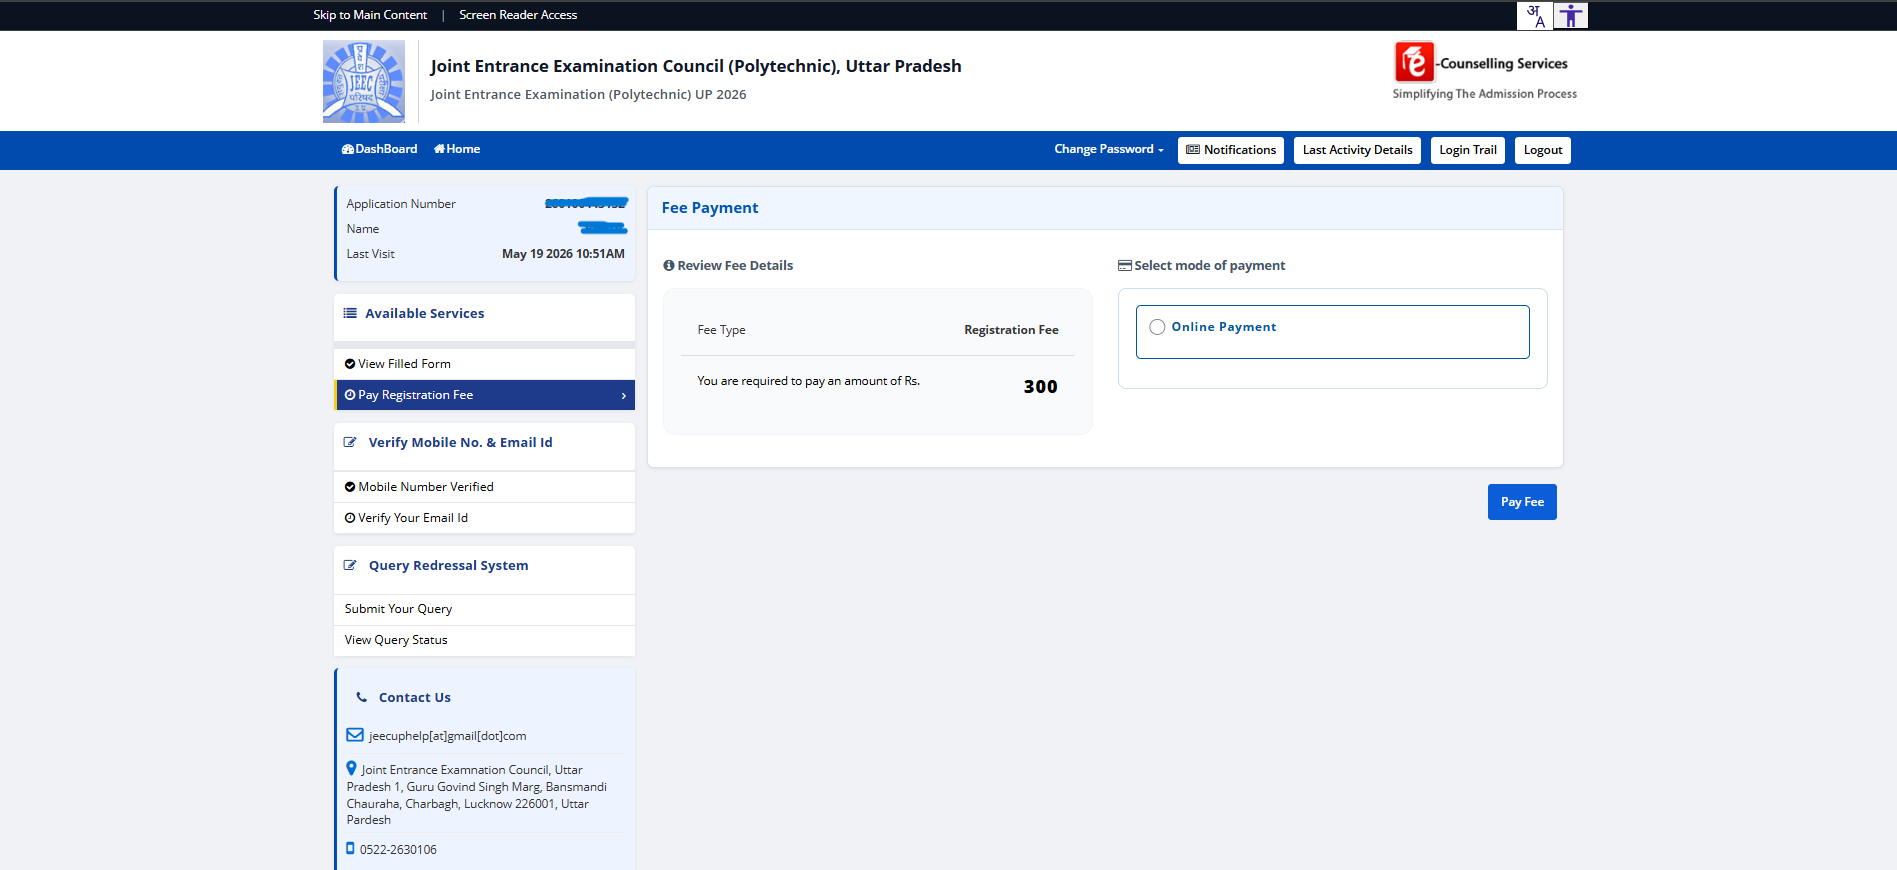
Step 14 — Pay the Registration Fee
The final step is fee payment. The portal shows the amount (Rs. 300 for General/OBC, Rs. 200 for SC/ST) and presents the Online Payment option. Click the radio, then Pay Fee, and you're routed to the payment gateway (NetBanking / UPI / Card). After successful payment, download and save the application confirmation slip — you'll need it through the entire cycle.
What happens after payment
- Confirmation slip — download immediately after payment. Carries your Application Number, transaction ID, and the option to print.
- Admit card — released 7–10 days before the exam date. Download separately when announced.
- Exam — held at the exam centre you preferred (subject to capacity). 3-hour CBT, Class-10 syllabus in maths/physics/chemistry.
- Results — declared roughly 2–3 weeks after the exam. Your rank determines counselling order.
- Counselling — separate cycle, starts roughly a month after results. This is where you fill institute choices including BIPE 4455. See /jeecup for the full counselling walkthrough.
Common mistakes that cause rejections
- Photo/signature too small or too large — the portal enforces 15–200 KB ranges strictly. Compress or recompress in any image editor before uploading.
- Mismatched name across documents — Aadhaar name and Class 10 marksheet name must match (or you must choose the "info doesn't match" Aadhaar option). Marriage-name changes or transliteration variants trip a lot of applicants.
- Wrong category selection — General candidates accidentally selecting OBC/SC/ST get blocked at document verification. Pick the category your certificate actually shows.
- Live Photograph not taken at time of application — uploading an old photo here gets rejected by image-similarity checks. Just open the camera and take a fresh photo.
- Forgetting to pay — the form is not submitted until the fee is paid. Many applicants reach Preview, close the tab, and never come back.
Where to get help if you're stuck
JEECUP's own helpdesk is at jeecuphelp@gmail.com / 0522-2630106 (Lucknow). For families in Eastern UP specifically, BIPE's admissions team takes JEECUP application questions on WhatsApp in EN / हिंदी every day — no fee for the conversation, no obligation to apply to BIPE. We walk dozens of families through the form each cycle.
Once your application is in and you have an admit card, the next thing to plan for is the exam itself, then counselling. The JEECUP guidance page covers the six-step path from form to BIPE 4455 allotment; the Diploma vs ITI vs B.Tech piece on this blog is worth reading if you're still weighing pathways at this stage.
More from the BIPE blog.
Questions about the diploma path?
BIPE's admissions team takes EN / हिंदी questions on WhatsApp every day. Or book a free shuttle visit from Varanasi Cantt to walk the labs.